Mid-to-large size facilities and campuses inevitably have hundreds of flow instruments to monitor, maintain and repair. For a reliability engineer, ensuring that all instrumentation meets ISO 9000 or similar standards is a time-consuming responsibility. These standards mandate that precision instrumentation needs to be validated or recalibrated as often as once a year. Sensor elements can become dirty, plugged or drift over time. The resistance and capacitance of electronic components also degrades, leading to changes in sensitivity or drift.
Once an instrument drifts out of specification, it must be recalibrated to maintain its original accuracy. Thermal mass flow meters are not immune to these factors. As a precision instrument designed to measure the molecular mass flow rate of gases in ducts and pipes, these types of instruments can require cleaning, verification and recalibration.
Many flow meter manufacturers falsely claim that in-situ (or in-place) calibration is an easy and inexpensive method for both verifying the meter’s original factory-calibrated accuracy and verifying the meter is in calibration. However, when evaluating thermal mass flow meters for in-situ calibration or validation capability, be aware that sensor drift will create false positives that reduce the reliability of the validation.
This article not only explores the role of stable no-drift sensor design, but also examines five methods of field calibration-validation to help end users choose the most accurate, stable and cost-effective in-situ calibration solution.
Background: wet sensor design
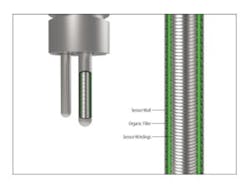
Figure 1. A typical wet thermal dispersion sensor. All images courtesy of Sierra Instruments.
The stability of all thermal mass flow meter sensors starts with mechanical design. The basic physics of thermal mass flow meters is attributed to Louie V. King, who published his famous King’s Law in 1914, which mathematically describes heat transfer between a heated wire and the fluid flow it is immersed into. King called his original instrument a "hot-wire anemometer," which measured the mass velocity at a point in the flow. The usage of hot wire anemometers grew, in particular, in research environments. This technology was not widely used in industry because of the fragile nature of the hot wires.
To solve this fragility problem, an industrial-strength sensor was developed in the 1980s that could be used in a broad spectrum of industrial process control applications. The solution was to coil the platinum wire around a ceramic mandrel and mold the wire in place with a glass coating. This assembly was then placed inside of a thermowell. However, the gap or boundary layer between the thermowell and the platinum-wound mandrel needed to be filled with something other than air to assure heat transfer from the sensor to the flow. This was the key to assuring an accurate and stable thermal mass flow meter. The air gap was filled with a potting compound — a conductive epoxy called thermal grease or cement. This type of sensor is known today as a wet sensor and is used by virtually all manufacturers of thermal meters (see Figure 1).
The problem: wet sensor drift
This wet sensor design proved workable, but it had an inherent weakness. The sensor would drift over time affecting the accuracy of flow measurement readings. As a function of its very principal of operation, the sensor is heated and cooled over time, expanding and contracting the cement inside the sensor. This makes it crack, settle and shift from its original state. This phenomenon is analogous to freshly poured cement on a sidewalk. Eventually, the cement hardens and often cracks, shifts and settles as it is repeatedly heated by the sun and cooled at night.
Because thermal sensors are precisely calibrated to determine the heat transfer versus flow characteristics, any change in the physical makeup of the sensor layers will invalidate this calibration, resulting in drift or outright failure. Excessive drift means users must send the meter back to the factory for recalibration.
Dry sensor: no drift thermal dispersion sensor
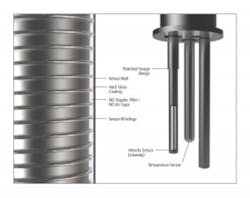
Figure 2. Dry thermal dispersion sensor
The best way to minimize drift in a thermal sensor is to remove the root cause: the epoxies, cements and thermal greases that make up the wet sensor. In March 1999, a new patented sensor design was introduced. Through a proprietary, highly controlled manufacturing process, the metal thermowell sheath is tightly formed on the mandrel and platinum-wire assembly. The sensor is designed to form such close contact that little or no air gap exists and no organic filler cements are needed (see Figure 2).
The cement-free sensor, known as a dry sensor, was patented by its manufacturer Sierra as DrySenseT Sensor Technology. All materials used to make the sensor are selected to assure that the coefficients of thermal expansion are approximately the same. As a result, they expand and contract at the same rate, limiting the stress and cracking. According to the manufacturer, using a dry sensor was the only way a manufacturer could claim stability over the sensor’s lifetime.
In-situ calibration verification
Despite wet sensor design weaknesses, to this day, many manufacturers of thermal mass flow meters still use the wet sensor design because it is easy and economical to build. In addition, most thermal meter manufacturers have generally the same method of using in-situ validation.
As expected, in-situ calibration verification of thermal flow meters is a highly marketed feature that claims to validate the sensor’s accuracy on location. In-situ verification does not replace calibration. If substantial drift is found, the flow meter must be sent back to the factory for recalibration.
The following section details five principles of thermal mass flow meter sensor validation to assess which in-situ verification method will result in the most accurate results, thereby saving time and lowering costs. These five approaches are: resistance, zero-flow, K-factor, full-flow, and flow-audit.
Validation using resistance
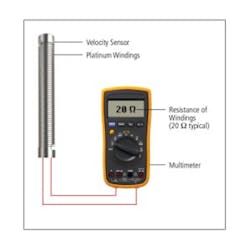
Figure 3. Validation using resistance
The simplest method measures the resistance across the velocity sensor. Since the velocity sensor is normally a platinum resistance temperature detector (PRTD), the measured resistance is directly related to the temperature of the sensor. This temperature should be equal to the space surrounding the velocity sensor once everything has come to equilibrium (see Figure 3).
This method only measures the resistance of the platinum wire that is wrapped around the platinum mandrel. As the dry versus wet sensor discussion illustrates, there is much more to a thermal dispersion sensor. Resistance measurement makes this a good troubleshooting tool in determining whether the wire has an open or short circuit and thus the sensor has totally failed.
Power must be removed from the velocity sensor, and it must be allowed to come into thermal equilibrium with its surroundings. Further, these surroundings must be at a constant temperature. In some cases, the meter can take as long as 30 minutes to reach thermal equilibrium and for that period of time it is not capable of measuring flow. If the temperature of the process fluid is fluctuating, this check cannot be done in-situ.
However, this method does nothing to measure drift because the test does not measure factors related to heat transfer from the wire through the epoxies and sheath into the flowing fluid. Therefore, this method can only be confidently used with dry sensor design which does not drift.
Validation using zero flow
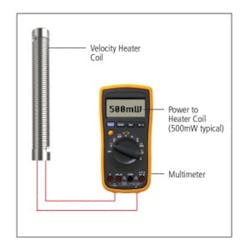
Figure 4. Validation using zero flow calibration
Most manufacturers have realized the limitations of validation using resistance and have various methods of checking the sensor’s electrical output (either power or raw sensor output voltage) at a zero-flow condition (see Figure 4). Zero flow is the only truly reproducible point between the factory calibration and the site where the meter is being used.
To understand how this process works, it is necessary to review the factors that influence a thermal dispersion –flow -meter’s calibration:
- Gas being measured
- Temperature and pressure of the gas
- The pipe the gas is flowing inside and the maximum flow rate the meter is expected to measure
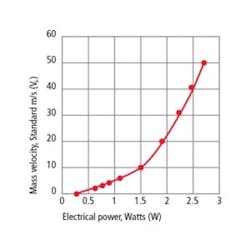
If a meter is in the same gas at the same temperature and pressure as factory calibration and the flow is zero, it should read the same sensor output voltage or dissipate the same power as it did at the factory. If it does not, it is because the sensor, or the electronics that drive the sensor has drifted over time.
Figure 5. Sensor output versus increasing flow rate
Reasons why this measurement can be problematic are:
- As stated, this measurement is only valid at zero flow, meaning the flow in the pipe must be either shut off or the flow meter partially removed from the pipe with a hot-tap.
- Even if the meter is at zero flow, it still must be in the same gas at the same temperature and pressure as factory calibration.
For these reasons, many manufacturers provide data for checking zero at another set of more reproducible conditions: zero flow at atmospheric pressure and temperature. This requires the meter to be completely removed from the process and allowed to come to equilibrium at ambient conditions. At best, this stretches the definition of in-situ verification, as it is not "in place."
The key drawback of validation using zero flow is that it is only valid at a single flow point. While this is a good indicator of the type of offset that can be caused by drift, it does nothing to validate the accuracy of the flow meter through its calibrated range.
Field adjustment using K-factors
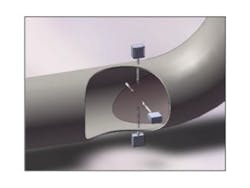
Figure 6. Multipoint flow meter system
As an interim step, many manufacturers enable the application of a global K-factor that works as a multiplier to the observed flow value. This is simply a linear offset most often employed to make the meter reading agree with another device. The problem with K-factors is that the inherent response curve of a thermal sensor to flow is non-linear and is best represented by a complex polynomial function, typically at least to the fifth order (see Figure 5).
In this procedure, the flow profile inside a large duct or pipe is characterized by measuring the velocities at various points, generally along horizontal and vertical lines. Because a thermal flow meter is a point velocity device, it can only measure the velocity at a single point in the total flow and is affected by flow profile disturbances. A flow traverse can determine the best placement of the flow meter, and may suggest that multiple points are needed. Some manufacturers offer multipoint thermal flow meter averaging systems for this purpose (see Figure 6). A flow traverse is not an in-situ calibration. It simply refines the placement of the meter, or determines a gross correction K-factor to bring the existing calibration in line with observed results.
Validation using full-flow
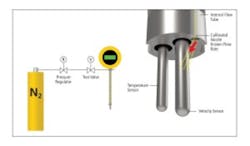
Figure 7. Validation using sonic nozzles
One complex and expensive technique that validates beyond a zero flow -condition checks the full-flow range by generating a series of known flow rates, from zero to full scale (see Figure 7). The system uses a small sonic nozzle opening that directs a known flow past the velocity sensor. The diameter of the nozzle is fixed, and by applying a known differential pressure across the nozzle, the flow through the nozzle can be calculated.
As with the other techniques discussed, this method has its drawbacks:
- It depends on the nozzle not becoming plugged or dirty (and thus changing the size of the nozzle from when it was calibrated) and requires precision pressure gauges, which themselves need periodic recalibration.
- The meter must be removed from the process (although not necessarily the pipe), so a hot tap system is required.
- This is a complex and expensive technique, requiring a source of pressurized air or nitrogen, a variable pressure regulator, tubing, and the nozzle. Such a system cannot be back-fitted, and the nozzle is a permanent fixture of the probe assembly.
Validation using actual flow-audit method
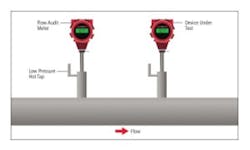
The flow-audit method is perhaps the very best in-situ calibration verification. This method uses a high-accuracy flow standard to prove the accuracy of the flow device under test (DUT). A flow audit is performed with a similarly calibrated meter that is installed into the pipe via hot-tap near the DUT, or even at the same measurement point if the meter under test can be removed. The key words above are "similarly calibrated;" a meter calibrated for natural gas cannot be used to check a meter on compressed air for instance. Likewise, the temperature and pressure as well as pipe size must be matched.
The ideal meter for the flow-audit method has the application flexibility to work on different gases and pipe sizes and to dynamically compensate for temperature and pressure differences. Many companies buy thermal insertion mass flow meters as audit meters because of their ability to insert the sensor into the flow via hot-tap. This adds convenience and avoids costly process shutdowns. However, traditionally, a thermal meter needs to be purchased for each specific application at the facility. For the majority of users, this is cost-prohibitive.
Figure 8. Audit-meter with hot-tap
For gas flow auditing, a solution now exists that allows a single thermal flow meter to be used across multiple pipe sizes and gases. Released to market in 2011, this insertion thermal mass flow meter is used as a flow-audit meter to check other thermal meters at a facility. Due to its high accuracy of 0.75 percent of reading, it is also commonly used to check many different gas mass and volumetric flow technologies.
Coupled with a hot-tap insertion point located near the DUT, the flow meter can be reconfigured in the field to match nearly any flow measurement point in a facility. The no-drift dry sensor offers stable, reliable measurement. As seen in Figure 8, the user programs the instrument to the exact gas and pipe size of the device under test and inserts the 3/4-inch (19-milimeter) sensor probe into the pipe near the DUT. Engineering units can even be programmed to match the DUT.
The flow-audit meter will immediately start reading flow. Compare this flow to the DUT. If the two units read close to each other, the DUT can be signed off -as validated -and -reading properly.
In-situ validation is not calibration
For four of the calibration validation methods, if the meter does not pass the validation, it generally must be returned to the factory for recalibration. However, using the flow–audit method does allow the end user to adjust a DUT using the K-factor method discussed previously to adjust the DUT to match the exact flow reading of the audit meter.
Precise thermal flow meter calibration occurs under tightly controlled temperature and pressure conditions using the same gas and the same size pipe section or flow body that the meter will be used in.
Such a facility is a large and expensive asset and certainly not portable. Consequently, for meters that are out of calibration, it is highly recommended to send it back to the factory or accredited flow calibration service center
for recalibration.
Validate, don’t calibrate
How can a sensor be validated that will drift out of spec due to the nature of its mechanical design? It is not possible. All validation methods assume that no drift exists. As described earlier, wet sensors are prone to drift and dry sensors do not drift.
Dry no-drift sensors have a big advantage during in-situ calibration validation. The all-metal, epoxy-free -mechanical design provides the confidence that the in-situ calibration validation is actually valid. Dry sensors are validated in the same way as a wet sensor, although in this case, it is not drift that is expected, but rather dirt or mechanical damage.
Conclusion
In-situ calibration validation is one of the benefits of thermal mass flow technology. Each of five methods of in-situ calibration validation approaches has varying cost and complexity, but it does offer the end user the advantage of proving some aspect of flow meter performance in the field to fulfill quality requirements.
When evaluating thermal mass flow meters for in-situ calibration validation capability, beware that sensor drift will create false positives that reduce the reliability of the validation. The assumption by manufacturers is that their sensor does not drift. Only with sensor stability can users truly validate a sensor’s factory-calibrated accuracy in the field. Assure that thermal mass flow meter has a drift-free, dry sensor, which has no organics and cements that drift over time.
Finally, it is highly recommended to use the flow–audit method for the highest quality calibration validation. All forms of in-situ calibration validation discussed give the end user information about the thermal meter’s operating performance, but only the flow-audit method actually validates the calibration at actual flowing conditions.
Matthew J. Olin has served as president and CEO of Sierra Instruments since 2003. He led the development of all of Sierra’s latest generation thermal, vortex and ultrasonic flow meters. With more than 20 years of experience in the fluid flow measurement and control industry, Olin has authored dozens of articles, whitepapers and blogs on the subject. He holds an MBA from University of San Diego and is a member of the Measurement, Control & Automation Association among other industry groups.
